|
|
|||||||||||||||||||||||||||

l' auteur
This article in pdf
Adaptation
|
Big Bertha /Baby Bertha
par Daniel W. Fromm
Contents1 Big Bertha As She Was SpokeAmerican sports photographers used to shoot sporting events, e.g.,
baseball games, with specially made fixed lens Single Lens Reflex (SLR)
cameras. These were made by fitting a Graflex SLR with a long lens -
20" to 60" -and a suitable focusing mechanism. They shot 4x5 or 5x7,
were quite heavy. One such camera made by Graflex is figured in the
first edition of Graphic Graflex Photography. Another, used by the
Fort Worth, Texas, Star-Telegram, can be seen at
http://www.lurvely.com/photo/6176270759/FWST_Big_Bertha_Graflex/ Long lens SLRs that incorporate a Graflex are often called "Big Berthas" but the name isn’t applied consistently. For example, there’s a 4x5 Bertha in the George Eastman House collection (http://geh.org/fm/mees/htmlsrc/mG736700011_ful.html) identified as a "Little Bertha." "Big Bertha" has also been applied to regular production
Graflexes, e.g., a 5x7 Press Graflex (http://www.mcmahanphoto.com/lc380.html)
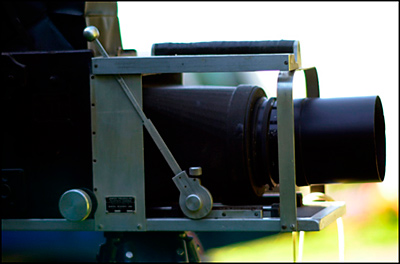
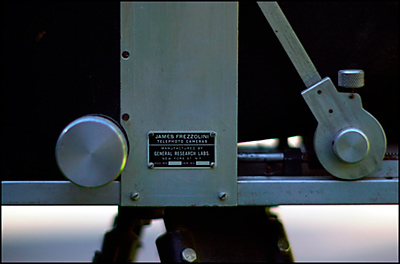
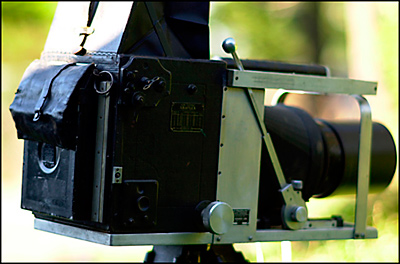
and a 4x5 Graflex that I can’t identify The term "Big Bertha" is an English translation of Dicke Bertha, literally "stout Bertha," the nickname of a 42 cm howitzer made by the Krupp works and used by German forces during WW-I. The gun was named after Bertha Krupp von Bohlen. Pictures of her found by Google show a slender woman. A wide range of oversize objects have been called "Big Bertha." In photography I think the nickname was first applied to the cameras discussed here. It was later bestowed on a number of UK-made lenses for aerial cameras, including a 36"/6.3 Dallmeyer telephoto lens used during WWII. More recently it has been given to a variety of large lenses, e.g., 600/4 Canon, Sigma 200-500/2.8, for 35 mm and digital SLRs. J. A. Sprague of Graflex is regarded as the inventor of the Big Bertha but other entities made similar long lens cameras from large format SLRs. I’ve seen claims that Burke & James made and sold Big Berthas, that employees of the Detroit News made one and that employees of the New York Daily News made one. Gandolfi, a camera manufacturer in the UK, made a long lens cricket camera that sounds very much like a Bertha; it incorporated a Gandolfi SLR, may have antedated Berthas based on Graflexes. The long lenses typically used on Berthas are in barrel, i.e., don’t have shutters. The practical reason for this is that a huge lens requires a huge shutter. This is why Berthas incorporate camera bodies with built-in focal plane shutters. Graflexes, Speed Graphics, the Arca Swiss Reflex and the Gandolfi reflex built into their cricket camera all have focal plane shutters. A traditional Bertha contains a Graflex body, with focusing rack and front standard removed, mounted on a slide. The slide is mounted on a "plank." Dan Schwartz’ 5x7 Bertha’s "plank" seems to incorporate angle iron trusses. A long lens – focal length between 20" and 60" – is mounted at the front of the plank, with a pipe, perhaps better called an extension tube, behind it. A short bellows sits between the pipe and the camera body. Everything is attached very securely to the plank. The Bertha is focused by moving the camera fore and aft on its slide, typically by a lever arrangement that incorporates adjustable focusing stops that can be pre-set for various distances. Some Graflex-made 5x7 Berthas incorporated a Press Graflex. Dan Schwartz reports that his is based on 5x7 Home Portrait Graflex. The Eastman House "Little Bertha" contains a 4x5 Super D. Eve Girard has shared pictures of her Bertha, badged "James Frezzolini Telephoto Cameras - Manufactured by General Research Labs," with me. It incorporates a Home Portrait Graphic but is not a typical Bertha; its lenses are mounted in cones, so are interchangeable, and the lens, not the camera body, moves to focus. Eve’s camera has one lens, an uncoated 50 cm/4.5 Zeiss Tessar. The lens isn’t a telephoto, also not typical of the lenses used on classic Berthas.
I’ve never seen a Bertha being used or read instructions for using one. It is clear, though, that planning must have been an important part of sports photography with a Bertha. The focusing stops had to have been set on points of interest in advance. For baseball games, I gather that the bases were the principal points of interest. Shutter speed and aperture were set in advance to give good exposure. I believe that when the photographer expected interesting action at a point of interest, he moved the lever to the point’s focus stop and aimed the camera at the point, using a wire frame finder to aim and, perhaps, compose. The Eastman House Little Bertha’s frame finder is consistent with this. The photographer would have released the shutter shortly before the decisive moment. Remember that it takes hundreds of milliseconds for a Graflex’ mirror to rise and its shutter to start making the exposure. A story in the September, 1952, Popular Science Berthas were replaced for most, if not all, applications by smaller, lighter, faster-working SLRs by the early 1960s. This was, I think, another manifestation of photographers’ movement to smaller formats as films improved and editors who’d been conditioned to expect 4x5 negatives died off [1]. 2 Dreaming of a Baby BerthaThe Bertha idea, but not its classic implementation, was embodied in a 6x9 Arca Swiss Reflex I once saw offered on eBay. This beauty was a 6x9 SLR body - the usual Arca Swiss Reflex has an integral focusing rail and front standard – mounted on a long rail. A long bellows connected the SLR body to a normal 6x9 Arca Swiss front standard. It has at least one advantage over the traditional Bertha; it allows interchangeable lenses. Plaubel made a similar 2x3 camera, the Pecoflex, essentially a 6x9 Peco Jr with the rear standard replaced by a slightly modified Makiflex. I was fascinated by that long rail 6x9 Arca Swiss but couldn’t afford it and didn’t have a Graflex to convert into a long lens SLR. At the time I understood Graflexes poorly so had no idea which of the incomprehensible 2x3 Graflexes I should want. Whatever the right model was, I doubted I could afford one. I had a 2x3 Speed Graphic so sketched a design of a long rail camera that incorporated it. I didn’t think I could make it myself and estimated that a machine shop would charge more than I could afford for making the parts needed. In addition I didn’t want to sacrifice the Speed; building a long rail camera around it would require removing front door, front standard, and bellows. Two 2x3 Speeds in the house, one of them mutilated, would have been one too many. I reasoned that much of a Bertha’s structure existed to get the extension needed to focus a long lens and saw a potentially not too expensive way to give my little 2x3 Speed Graphic more extension. A tandem camera, i.e., a pair of Graphics set on a rail with a coupler between them. I believe I first saw the words "tandem camera" in A. A. Blaker’s book Field Photography. I probably took the idea for a tandem Graphic from him. The parts needed to assemble my 2x3 Speed and Century Graphics into a tandem Graphic - my design, improved by Adam Dau of SKGrimes – weren’t very expensive. The result works well but has two shortcomings. Since I focus it on the rear camera’s ground glass, actually taking a picture requires inserting or attaching a film holder after the shot is focused and composed. This is quite time-consuming and risks shifting the point of aim. In addition, a simple model predicts that because of vignetting by the rear camera’s front standard the longest lens that will illuminate 2x3 evenly is around 435 mm. In fact the model is very conservative; my 480/9 Apo-Nikkor works well on the tandem, but it is clear that there’s a limit.
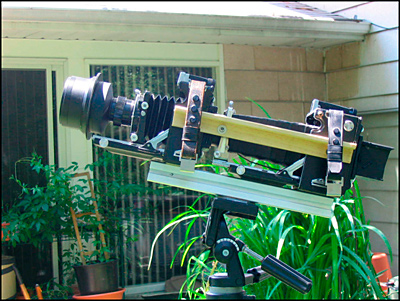
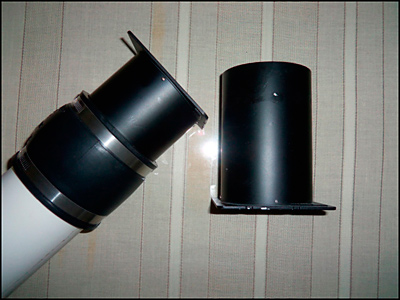
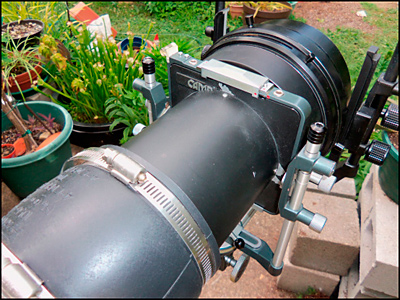
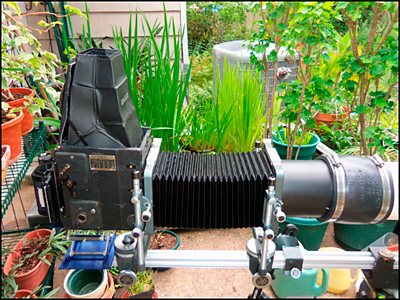
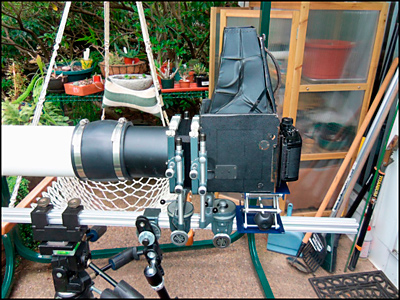
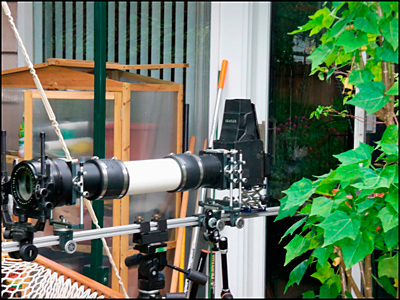
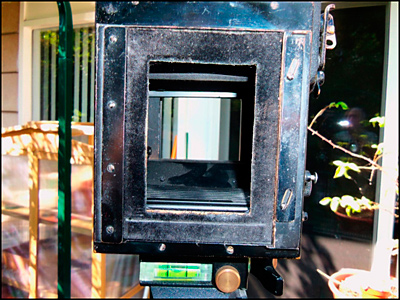
3 Baby Bertha conceivedThe tandem works as intended and is useful, if slow-working, but I still wanted a 2x3 Baby Bertha. Fortunately there are occasional pricing anomalies in the market for used cameras; eventually I came across a $20 2x3 Graflex RB Series B. The RB Series B is a fixed lens SLR with limited extension and a rotating back. This last is very useful, allowing shots with the long side of the image horizontal or vertical as desired. The $20 marvel had no lens, but that was no handicap. After fiddling with my RB and reading the instructions available on http://www.graflex.org I realized that it operated more or less properly. It could serve as the basis of a Baby Bertha. I revisited my design for a long lens camera incorporating my little Speed Graphic. Building a classic Bertha around a 2x3 Graflex would cost the same, i.e., too much. The Arca Swiss/Pecoflex approach - mount a 2x3 RB Series B body on a view camera’s rear standard - looked more promising. My first sketches along those lines used a Calumet CC-401 4x5 camera to get the extension. The CC-401 is a capable and robust monorail view camera with rotating back, fixed bellows, geared rise, a 25" rail and approximately 22" maximum extension. A 2x3 RB Series B can be attached to its rear standard. Total extension will then be somewhat more than 27", more than enough for lenses up to around 24" (of normal construction, i.e., neither telephoto nor retrofocus). That I could buy a CC-401 with good bellows for less than $50 added to the idea’s appeal. Hanging a 2x3 RB Series B Graflex on a CC-401 seemed the least expensive way to make a Baby Bertha but it has limitations. Adding extension for closer focusing or use with lenses longer than around 24" doesn’t seem easy. Attaching an RB requires modifications to the CC-401 that render it unusable as a 4x5 camera. Even so, given the prices that lenses usefully longer than 600 mm command, a Bertha built around my $20 2x3 RB Series B and a CC-401 seemed a good interim, possibly even a good long-term, way to get a long lens 2x3 SLR that could use all of my longer lenses, including a 610/9 Apo Nikkor I’d bought hoping find a way to use it. 4 Baby Bertha’s gestationI did the obvious, bought a scruffy CC-401 via eBay.com. Shortly before it and the RB were ready to send to the machine shop to be mated the late Charlie Barringer gave me an insurmountable opportunity in the form of a 2x3 Super Cambo, SC for short, with standard and bag bellows. Charlie’s generous gift derailed my plans. The Super Cambo is a modular view camera with slightly more movements and much more elegance than the CC-401. Its bellows, unlike the CC-401’s, is easily detached. Its rail is a simple 1" x 1" aluminum extrusion; the CC-401’s is a slotted steel rod. Neither type of rail accepts extensions, but pieces of 1" x 1" t-slotted aluminum extrusion up to 96" long are inexpensive and readily available. The SC was made in four sizes, 2x3, 4x5, 5x7, and 8x10; the 2x3 is smaller and lighter than the CC-401. After I’d played a little with my new Cambo I realized that I’d often want to use it instead of a 2x3 Graphic and that a Bertha could be built around it. Putting the CC-401 in the closet and attaching the RB to the Cambo seemed best, if only because it would save me from traveling with a 2x3 and a 4x5 view camera. Attaching the RB requires no modifications to the Cambo. The 2x3 SC’s standard rail is 30 cm long and its standard bellows will stretch to at most 15". A Bertha made from a 2x3 SC and a 2x3 RB doesn’t have enough extension to focus a 24" lens. The rail’s too short; on a rail that’s long enough the standard bellows is too short. The rail problem is easily solved; 1" x 1" t-slotted aluminum extrusion (80/20 brand, section 10) is inexpensive and the SC’s standards fit it. SKGrimes cut a 30" piece, the standard length for the 8x10 SC, for me. Getting a longer bellows is harder. Cambo offers only two bellows for their 2x3 cameras. The standard, which stretches to at most 15", and the bag, which is much shorter. New bellows, if available at all, are very expensive. Used bellows exist but are hard to find and an intermediate standard as offered for the 4x5 SC is needed to connect and support two bellows. No intermediate standard was offered for the 2x3 SC. Buying a second 2x3 Cambo SC would, however, get two standards and one standard bellows. Finding another 2x3 SC or two for pennies would solve everything, but 2x3 SCs are uncommon and rarely sell for pennies. The obvious (?) solution was to make an extension tube. Two 2x3 Cambo lens boards, a 12" piece of nominal 4" PVC drain pipe, and some magic from SKGrimes would do the job. Robert White had a clearance sale, offered new boards at £15 each. Used ones turn up, but not often and usually for more, so I bought new boards from Robert White. This wasn’t as easy as it seemed; I paid for four boards, Robert White delivered two and had to be spoken to before they’d send all I ordered. PVC drain pipe is light, inexpensive, easily worked, and I had a 5’ section of it on hand. It has a few drawbacks: it is translucent and its interior is very smooth and shiny. One doesn’t want an extension tube with either attribute. The cure for both is lining the tube with flocked paper as is sold by, e.g., Edmund Optics. The 12" tube that SKGrimes made for me weighed 500 g as delivered. It allows Baby to use my 610/9 Apo Nikkor but is too short for the 900/10 Apo Saphir I later purchased. After I got the 900, I got two flexible rubber couplers with hose clamps as sold for connecting 4" drain pipe from Home Depot and bisected the 12" extension tube into two 6" sections. One coupler holds it together, to be used as originally intended. The second coupler and a 12" section of pipe give the length needed to use the 900. The bisected 12" tube with coupler, weighs 942 g. The complete 24" tube, with two couplers, weighs 1,719 g.
One end of the tube attaches to the rear of the front standard, the other has to attach to the bellows. I’d originally planned to use clips to hold the bellows to the extension tube, then came across a used 2x3 SC carrier frame - in Cambo parlance, a carrier frame is the piece held between the uprights to which lens boards, bellows, and backs are attached – and thought it better. Before I bought the carrier frame and bits with which to improvise a support for it I found a complete 2x3 SC standard chez Glenn Evans (http://www.glennview.com) that was much too expensive but far superior to clips or a poorly-supported carrier frame. So I gritted my teeth and bought it.
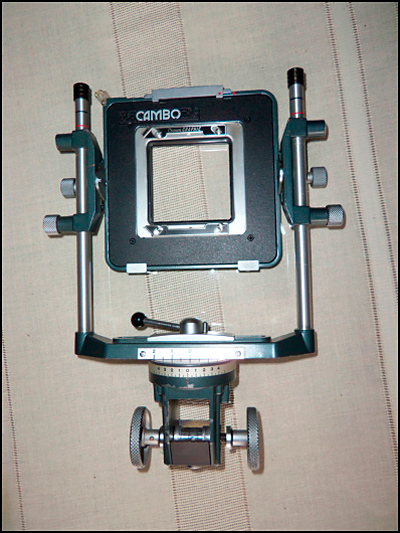
The "new" standard is unlike the two I already had. The Super
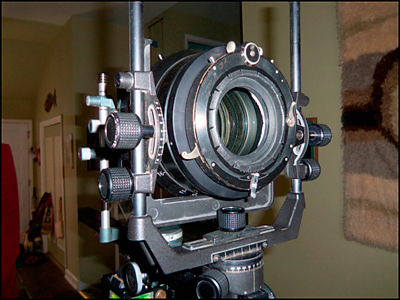
Cambo catalog at The standards that came with Charlie’s gift are the usual, have the swing axis centered on the base, and in the plane of the carrier frame. Lens boards and bellows attach to the carrier frame. The rail riders are fairly long; with the riders touching, the flange-to-film distance is 71 mm. This is limiting. The alternative with "double base control lock" has with the shift plane displaced 35 mm from the rail rider’s center; the swing axis passes through the rail rider’s center (see fig. 8). As with the "single base control lock" standard, the shift plane coincides with the carrier frame. Mounting the "double base control lock" standard normally (carrier frame towards the rear standard) in front of one of the old ones mounted backwards (carrier frame facing the front standard) on the rail reduces the flange-to-film distance to 48 mm, making the camera much more useful with short lenses.
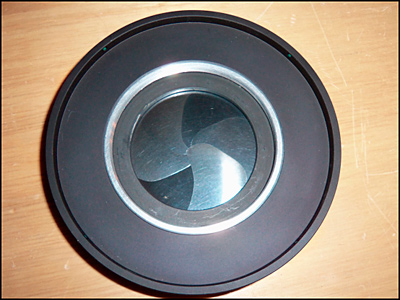
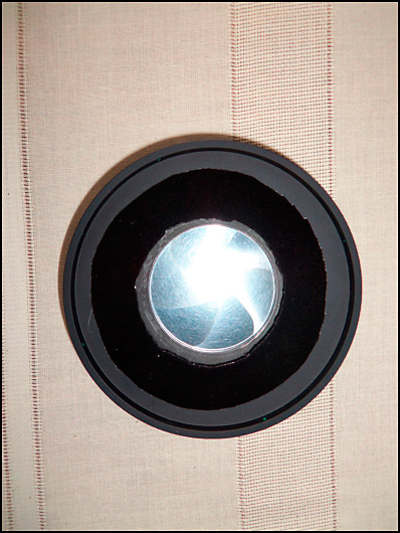
The 12" tube came back from SKGrimes painted black inside and out. The interior was still a little shiny, so I lined it with flocking paper as planned. The paint on the outside doesn’t adhere well, scrapes off easily. No matter. Standard bellows plus 12" tube gives more than enough extension for my 610/9 Apo Nikkor. Remember that the RB’s body is about 6" deep. The logical next step up from 600 mm is around 1200 mm. I’ve never seen a 1200 mm lens I could afford but while Baby was teething a vendor on ebay.de offered a 900/10 Apo Saphir. I bid low and won. I should have been outbid by a large margin, but a miracle (?) happened. My experience with my tandem Graphic taught me that mounting a long lens in front of a #1 shutter, which seems ridiculously small, works well; this is true for the lenses I used on the tandem but not for f/9 lenses longer than 600 mm. A #1 offers accurately timed shutter slow speeds slower than the tandem’s 2x3 Pacemaker Speed Graphic’s (1/30) and Baby’s RB’s slowest (1/10, and its slower speeds are suspect) and will synchronize with electronic flash. Not having tried a lens longer than 480 mm in front of a #1, I believed that Baby Bertha could have a #1 shutter at the front as well as the RB’s focal plane shutter at the rear. When the 900 and its mount adapter came back from Grimes I discovered that I was mistaken about mounting it in front of a #1 shutter. Hanging a lens in front of a #1 works well only when the lens’ exit pupil is less than 30 mm in diameter. If the exit pupil is larger than 30 mm, the shutter occludes the exit pupil and the lens’ own diaphragm can affect transmission only after it has been closed far enough to make the exit pupil 30 mm in diameter [3]. From there down the diaphragm has the expected effect. With the 900 mounted in front of a #1 it is unusable at apertures smaller than f/32 [4]. Testing found that this is also a problem, but not as bad, with my 610/9 Apo Nikkor; in front of a #1 its diaphragm takes effect slightly wider than f/16. My 480/10 Apo Nikkor’s diaphragm takes effect at f/11. This is why I was able to shoot the 480 at f/11 mounted on a #1 on my tandem Graphic. Surprisingly, a #1 shutter can bear the weight of a 610/9 Apo Nikkor and its mount adapter. The 900 Apo Saphir is much heavier, requires a support. Since I had a 4x5 SC standard, the least expensive obvious way to make a crutch was to modify it; remove the carrier frame and mill the uprights slightly so that the lens will fit between them. The crutch is usable with shorter lenses too. The mount adapter to #1 that Adam Dau of SKGrimes designed and made for the 900 Apo Saphir was an elegant solution to the problem of holding the 900 in front of a #1 shutter and attaching the assembly to a 2x3 Cambo front standard. Unfortunately, because of a failure of imagination on my part it was useless. The cup that accepts the lens and the lens board modified to hold it have since been reworked into an adapter that holds the lens to the board and that doesn’t obscure the exit pupil at f/9.
I knew I’d use the Cambo as a view camera as well as with an SLR module hung behind it. To economize on lens boards I sacrificed a spare 2x3 Pacemaker Graphic front standard and a 2x3 Cambo board that SKGrimes used to make an adapter for attaching lenses on 2x3 Pacemaker boards to the Cambo. The adapter makes many of my lenses in shutter and on 2x3 Pacemaker boards usable on the Cambo. Baby needed the adapter but I can’t honestly charge it to the Baby project; the Cambo needed it too.
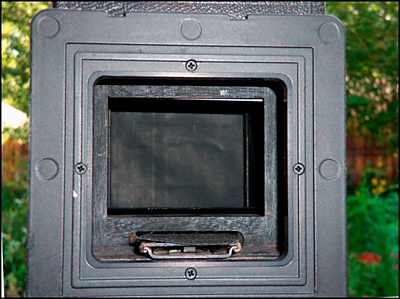
It isn’t obvious, but there’s a gap between the front of the RB’s focusing hood and the inside of the box. This is not a problem if the camera is used as made but with the bellows removed the gap lets light enter the camera. Easily plugged. 5 Baby cuts her teeth - solve one problem, find another – and final catastropheAll of my lenses longer than 160 mm are in barrel so must be mounted on Baby, as they are on my Graphics, in adapters in front of a shutter. The adapters, the shutter, and simply being in front of the board all add extension. With the standards set up to put their carrier frames as close together as possible the shortest of my lenses in barrel that will focus to infinity on Baby is my 250/6.8 Béryl. If I put my 210/6.8 Béryl’s cells in a #1 shutter on a Cambo board the lens will just focus to infinity on Baby. Baby is most emphatically a long lens SLR. Baby can be set up with the 610 on the 51 cm rail but this isn’t the good idea it first seemed because RB hangs out past the end of the rail, making it impossible to put a support under it. The 30" rail should be used with the 610, the 51 cm is usable only with shorter lenses. With the slow lenses I use the view on Baby’s ground glass is dim but usable. When ambient light is bright, light entering the hood makes viewing difficult. This because in order to see the ground glass clearly I have to keep my head some distance above the hood’s opening. Glasses with a stronger close correction, or perhaps the right reading glasses, and a dark cloth may be needed. At this point in Baby’s progress I wasn’t sure I could consistently recognize the point of best focus very well when peering into the hood. An alternative to peering into the hood is raising it at the front and putting a loupe directly on the ground glass. This is clumsy, but so is using Baby. After all of the bits (first tranche: modified RB, extension tube, and Cambo board that accepts lenses on 2x3 Pacemaker boards) came back from SKGrimes I tested the RB’s shutter with a Calumet tester. Shutter speed responded only slightly to changes in the tension setting. I tried to adjust it following advice from Bert Saunders, one of the gurus on the http://www.graflex.org help board. That the shutter didn’t close smartly from the "O" setting at tension "1" was a sign that tension had to be adjusted. Much fiddling didn’t improve the RB’s range of shutter speeds. 1/30, 1/125, 1/400, and 1/800 were all it had. Charles Monday, another graflex.org stalwart, later overhauled the shutter. After his work, 1/30, 1/140, 1/400, and 1/1000 are all it has. Charles also cleaned the RB’s mirror and ground glass and put felt dampers on the mirror. Composing is easier, focusing too but still harder than I’d like. The mirror is quieter now. When first tried out in the field with the 610 mounted, Baby was a handful. It is heavier than the tripod head I used then (Bogen 3047/Manfrotto 029) liked; the head flexed a little and the pan movement was stiff. Mirror slap caused considerable vibration, in part because of the head’s flexing. Just touching Baby made the image on the ground glass dance. I hadn’t expected aiming Baby to be much of a problem with the 610 - on 2x3 the horizontal angle of view is nearly 8 degrees - but it was. Since then I’ve replaced the 3047/029 head with a 3039/229 head that bears Baby’s weight much better. After I assembled Baby for the first time I thought - mistakenly – that the Cambo 2x3 SC’s standards weren’t quite as rigid as needed. The rear standard leaned back a little because of the RB’s weight, the front standard leaned forward a little because of the 610’s weight. The rear standard was the worse problem because it allowed the RB to move relative to the rail. Tightening the focusing locks as much as possible keeps the standards from tilting but makes focusing impossible. Close examination found that with the rear standard locked in place the RB’s mounting plate -a modified 2x3 SC lens board - can move a little in the carrier frame. An inexpensive 4" x 4" lab jack from Lab Connections (www.labconusa.com , their SKU 3588-1, "Lab Jack Aluminum 4"(100mm)") supports the RB very well and slides freely on the rail when I focus by moving the rear standard. One problem solved. Using a lab jack to support the RB requires something under the camera to support the jack. The 51 cm and 30" rails allow more than enough focusing travel and support the jack with, respectively, lenses up to 480 and 610 mm. I got a 48" 80/20 brand 1"x1" t-slotted aluminum extrusion via Amazon.com to use with the 900 and shorter lenses. As mentioned the front standard initially sagged a little under the 610’s weight. Locking it tight solved the problem and can be done because, thanks to the lab jack, I can focus Baby by moving the rear standard. The crutch later made for the 900 helps too. The next problem I addressed was that the rail that seemed to rock a little on the tripod head’s quick release. This was a cork-faced Manfrotto 130-14 hex plate, standard issue with the 029 head. The cork may not be fully compressed. The Cambo "single clamp" tripod block’s small footprint may also contribute to this problem. I replaced the tripod block with Cambo’s C-378 (I think that’s the model number) "Monorail connector/double tripod mount," bought from a seller on ebay.de, and the 130-14 with a 130-38 flat bottomed hex plate with 3/8" screw, bought from B&H. The double tripod mount is longer than the hex plate and the new hex plate can be attached more tightly than the old. These two changes partially solved the rocking problem. With all this done, the rail still rocked on its tripod. The effect was especially bad with the 900 mounted. I found that my Berlebach 8023’s center post moved a little in the top of the tripod. The solution is a Manfrotto 244N Variable Friction Magic Arm with camera mount (attaches to the bottom of the t-slotted aluminum rail) at one end and a Manfrotto 035 Super Clamp (attaches to a tripod leg) at the other, both bought from B&H. Not my idea, I stole it from Robert Polidori. See http://www.cnngo.com/hong-kong/play/robert-polidori-257129
At this stage of development, the rail was nearly immobilized fore-and-aft on the head, could still rotate a little around the center post’s axis. I contemplated getting another Magic Arm. Baby was, however, finally stable enough to test with film. Setting up for the first film test brought surprises: The tripod QR plate wasn’t fastened tightly enough on the Cambo tripod mount and the mount turned on it. I backed out all the screws, retightened carefully. Depending on the lens and the focused distance, the Magic Arm’s camera mount, which I attached to a sliding piece in the 80/20 rail, interferes with the rear standard or the RB’s lab jack. I attached the Magic Arm’s camera mount to a short Cambo tripod mounting block and attached the tripod block to the rail. This solved the problem. Test shots found that unsteadiness was no longer a problem. I shot three Apo-Nikkors, 610/9, 480/9, and 420/9, mounted in front of a #1 shutter. All three were easily aimed and focused at full aperture; for the 610, that was a bit wider than f/16. The Graflex’ finder was unexpectedly bright. Whether I achieved as good focus as possible is an open question. The lens board retaining sliders on the 2x3 Pacemaker front standard were a little slack so with a lens attached the shutter and its board tilted down a little. Tightening the sliders didn’t fix the problem completely so I mounted the crutch. The crutch works. When shooting at full aperture the focus, compose, pull darkslide, shoot sequence went fairly rapidly. Stopping down requires a walk to the front of the camera to stop down, then a walk back to pull the darkslide and shoot. In theory the RB’s mirror keeps light from the film plane – if it leaks the shutter is closed - so the darkslide can be left out but at times I’m excessively cautious. I set up my best tripod, a Berlebach 8023, with the middle leg sections fully extended and with the legs at 45 degrees. Set up this way, the tripod wasn’t at all happy. Baby is over its weight limit. I think that reinforcements clamped to the legs will solve the problem and will be much less expensive than another stronger tripod. The results of the first film test were very upsetting. On the one hand, unsteadiness isn’t a problem and I can sometimes focus Baby well enough with naked eye peering at the RB’s ground glass. On the other, the test shots, taken with the RB’s back in portrait orientation, showed massive vignetting. The portion of the frame that was exposed is roughly 57 mm x 65 mm. The RB has a gate at the front of the mirror box. It is roughly 45 mm high x 65 mm wide and approximately 115 mm in front of the film plane. It vignettes severely with the back in portrait orientation with lenses longer than around 250 mm and in landscape orientation with lenses longer than around 500 mm. I can’t use my long lenses on Baby and there’s no way to fix it.
There ended my dream of using a 2x3 SLR with long lenses. The Cambo can, however, be used with my long lenses without its RB module, so the effort hasn’t been completely wasted. Glenn Evans and Eve Girard have suggested that I can accomplish what I want - shoot a 2x3 long lens SLR - by replacing my 2x3 Graflex with a 3x4 or 4x5 Graflex with a 2x3 roll holder. 6 Building Baby Bertha around a 2x3 Cambo SC reconsideredI had what I thought were good reasons for building Baby Bertha around my gift 2x3 Cambo instead of the Calumet CC-401 I bought shortly before I was given the Cambo. As Baby teethed and I learned how to use her, I realized that although a CC-401 seemed to be the least expensive starting point for making a Bertha to be used with lenses up to around 24" a modular monorail such as a Cambo SC is preferable. This because of the ease of using lenses longer than 24" and because of the ease of attaching supports for a Graflex (at the rear) and the lens (at the front). My CC-401’s standards can’t be locked down absolutely tight, so will tilt a little when loaded with, e.g., a Graflex or a heavy lens that can’t be roughly balanced on the standard. The CC-401 was a dead end. Given the rarity and prices of 2x3 view cameras, a 4x5 modular monorail, e.g., a 4x5 Cambo, seems a better starting point for a 2x3 or 4x5 Bertha than a 2x3 modular monorail. I mention Cambos here because complete 4x5 SCs, bellows, boards, and standards are abundant and inexpensive. In addition, thanks to 80/20 there are inexpensive long rails for SCs. Baby would have been as functional, heavier, and much less expensive if built a 4x5 instead of a 2x3 Cambo. I’m not well acquainted with the Sinar system but suspect a 4x5 Sinar would be at least as good a basis for a 2x3 (or 4x5) long lens camera as a 4x5 Cambo. Sinar cameras and parts are at least as available as Cambo cameras and parts. 7 Mistakes/good decisionsTrusting that my $20 RB Series B’s shutter worked correctly was a serious error. I should have tested it before committing myself to making a Baby Bertha. The original 12" extension tube looked like a costly blunder and an unwise investment. Now, however, that I have a 900/10 Apo Saphir the tube is essential. Starting from a 4x5 SC would, however, have let me use an inexpensive bellows and standard instead of a relatively expensive custom-made tube. When I bought the third standard, I wasn’t sure getting it was a good idea. Now that I’ve had the opportunity to use it I’m very glad I bought it. My initial idea of clipping the tube and bellows together just wasn’t workable. The alternative, using a spare carrier frame - I found one on offer - with improvised support is nearly as bad. Tube and intermediate standard make my 2x3 Cambo useful as a long lens camera.. Mutilating a 4x5 Cambo front standard to make a crutch seemed like a good idea, especially since I had one on hand. A little lab jack like the one I bought to support the RB module would work as well as long as the 900 doesn’t have a shutter in front of it. If Baby had worked as intended the crutch would have been a mistake. The 900 with Compound #5 attached is, however, better supported by the crutch than by a lab jack. 8 What was rescued from the wreckageUsing the 900 in front of a #1 shutter as I originally planned is physically possible but impractical. Fortunately the 900’s mount adapter could be reworked to eliminate the #1 and the lens can be used on a 2x3 Cambo with a large shutter mounted in front of it. Compound #5 and Ilex #5s (maximum aperture 64.5 mm, limits the 900 to a little wider than f/16) are just large enough. I have a Compound 5, bought in anticipation of need from a seller on leboncoin.fr. Hanging it in front of the 900 required an adapter, as usual from SKGrimes. The adapter slips over the front of the lens, where it is retained by small rubber-tipped set screws, and the shutter screws into it. The rear of the shutter is very shiny. Reflections from it would probably generate flare so I put flocked paper from edmundoptics.com, conveniently located three miles from my home, on the adapter to hide the bright metal.
Reworking the 610’s mount adapter to mount the lens directly on a board and making an adapter to hold the Compound 5 on its adapter to the lens would gain a bit more than one stop. Until proven otherwise, the gain isn’t worth the cost. All of the shorter lenses I’d intended to use on Baby can be used without problems mounted in front of a #1 shutter. The tubes and intermediate standard needed to get extension for my long lenses can be used without the RB. The Baby Bertha project left me with a perfectly fine 2x3 view camera that can be used with lenses from 35 mm to 900 mm. The significant losses from the project’s failure are the 2x3 Graflex body and everything spent on it and the jack stand. After everything mentioned above had been done I found and bought most of a 2x3 Cambo (standards, pleated bellows, international back, and lens board, i.e., all but a rail and tripod mounting block) for pennies, $113 delivered, to be exact. The bellows weighs 155 g, extends to 15", and is easier to transport than the 12" tube. Using it instead of the 12" tube (942 g) with lenses up to 600 mm makes good sense. The complete 24" tube, however, is still needed to use the 900 on a 2x3 Cambo. Notes & References
This
article in pdf
Dernière modification : 2013 |
||||||||||||||||||||||||||
|
|||||||||||||||||||||||||||


